
The behavior in the chatbot app interface will determine how the app user can interact with the OpenAI chatbot.
Adding behavior to an app is covered elsewhere in this guide. Click HERE for more information.
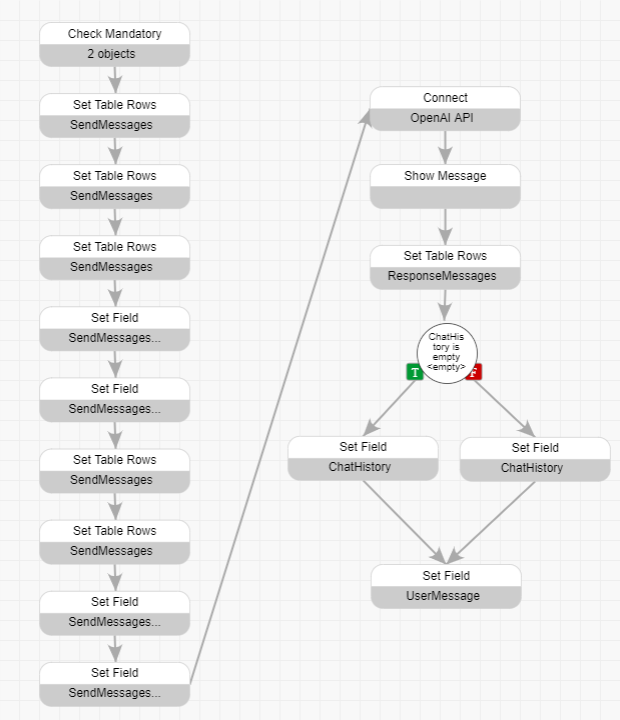
All of the logic is contained on the "Button is Pressed" Behavior event on the "Send" button.
Please refer to the diagram at the bottom of this page to get an indication of how your behavior should look.
|
Using PerfectApps logic to connect the interface with the OpenAI API connection: |

1. Select the "Send" button and open the "Button is Pressed" behavior event.
2. Include a Check Mandatory behavior command and include the fields "Topic" & "UserMessage".
3. Add three Set Table Rows behavior commands. (To add a row at the end and to select that row)
a) In the first command select the "SendMessages" table and the action "Delete all rows". This will clear the table of data from any previous questions asked.
b) In the second command select the "SendMessages" table and the action "Add row at end"
c) In the third command select the "SendMessages" table and the action "Move current row to last row"
4. Add two Set Field behavior commands. (To add data necessary for the connection send parameters)
a) In the first command select the table/column "SendMessages - message.role - Current Row" and the text value of "system".
b) In the second command select the table/column "SendMessages - message.content - Current Row" and the value of a field as "Topic - Caption"
5. Add two Set Table Rows behavior commands. (To add another row at the end of the table and to select that row)
a) In the first command select the "SendMessages" table and the action "Add row at end"
b) In the second command select the "SendMessages" table and the action "Move current row to last row"
6. Add two Set Field behavior commands. (To add data necessary for the connection send parameters)
a) In the first command select the table/column "SendMessages - message.role - Current Row" and the text value of "user".
b) In the second command select the table/column "SendMessages - message.content - Current Row" and the value of a field as "UserMessage"
7. Add a Connect behavior command. (To initiate the connection to the OpenAI API)
a) Select the OpenAI API connection & action created at Step 2: Set up a connection to the OpenAI API
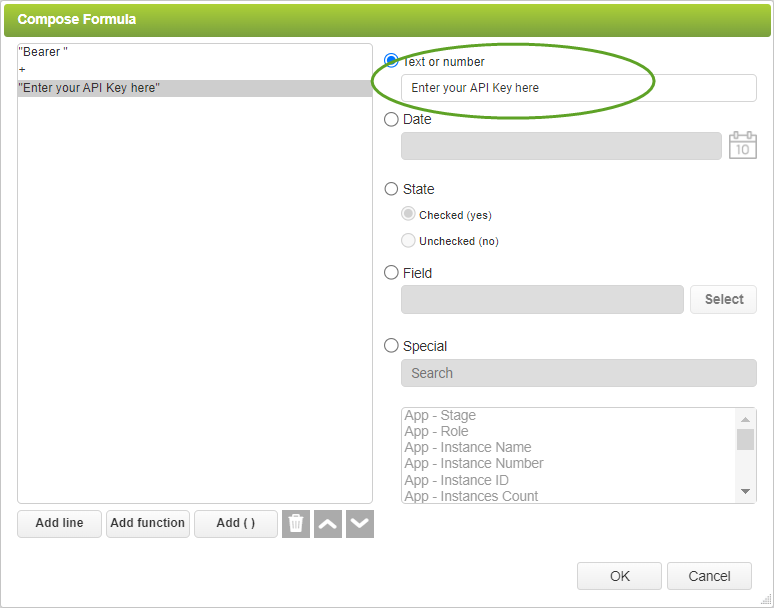
b) For the source of the "Authorization" send parameter use the formula option and set the parameter to be "Bearer <your API Key>" (Remember a space after 'Bearer ' and enter your API key in the "Text or number" field highlighted below)
 |
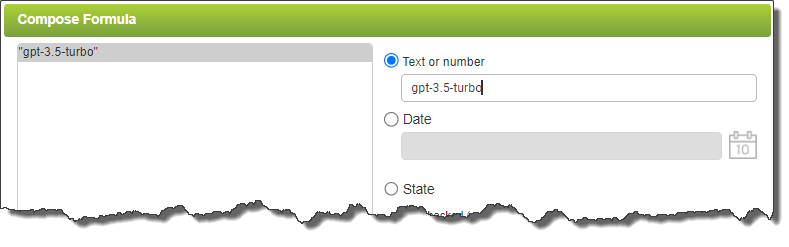
c) For the source of the "model" send parameter use the formula option and set the parameter to be "gpt-3.5-turbo".
 |
d) For the source of the "messages[].role" send parameter navigate to the "SendMessages" table and select "messages.role - All Rows"
e) For the source of the "messages[].content" send parameter navigate to the "SendMessages" table and select "messages.content - All Rows"
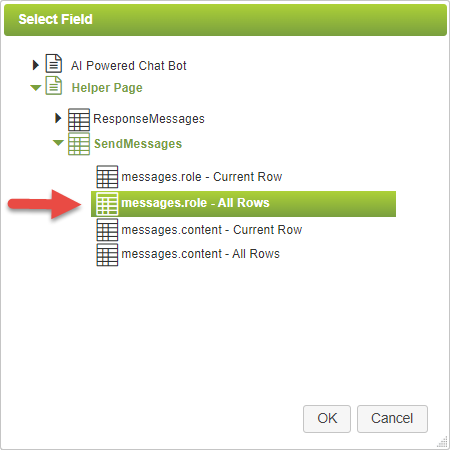
f) In the Return Parameters section navigate to the "choices[].message.role" parameter and for the target navigate to the "ResponseMessages" table and select "messages.role - All Rows"
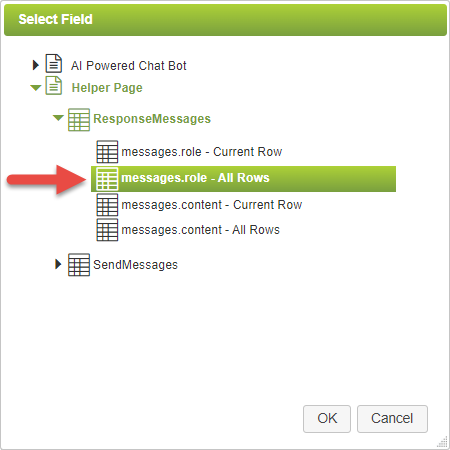
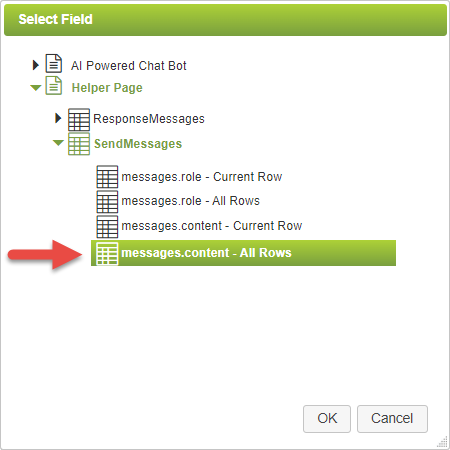
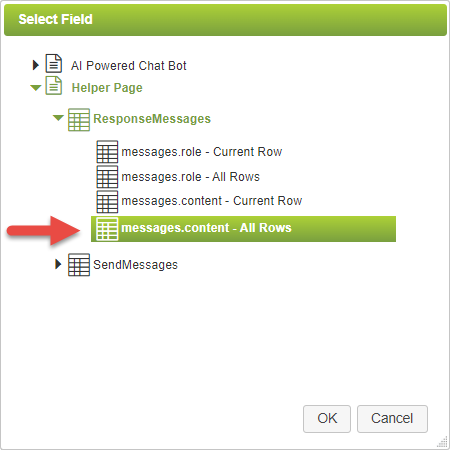
g) For the target of the "choices[].messages.content" return parameter navigate to the "ResponseMessages" table and select "messages.content - All Rows"
8. Add a Show Message behavior command with no text. This is used to pause the execution of the behavior momentarily, allowing time for the response from the Connect command to be received.
9. Add a Set Table Rows behavior command.
a) Select the "ResponseMessages" table and the action "Move current row to last row".
10. Add a Simple Branch behavior command. A slightly different behavior is required for the first response which will be the case when the ChatHistory field is empty.
a) Set the condition to "ChatHistory is empty".
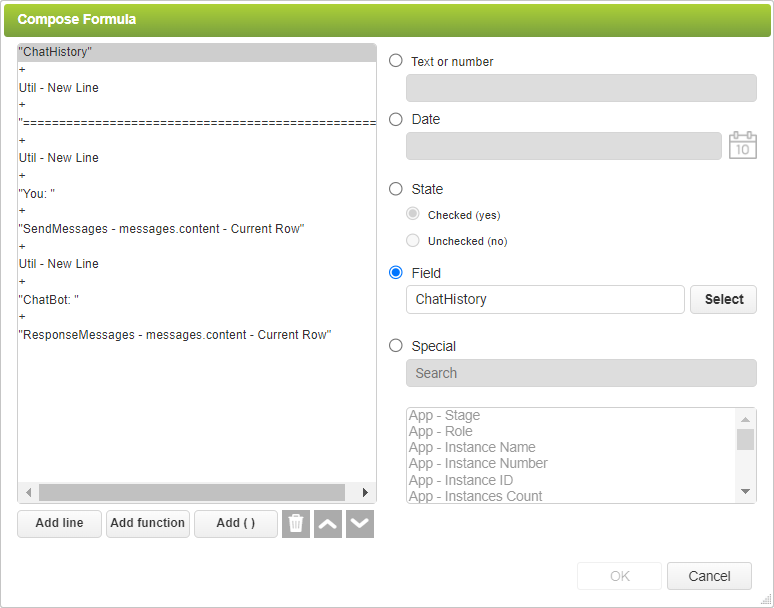
11. Add two Set Field behavior commands. One linked by the True path from the simple branch command and one by the False path.
a) For the command linked by the True path set the "ChatHistory" field value using the Formula Editor as follows:
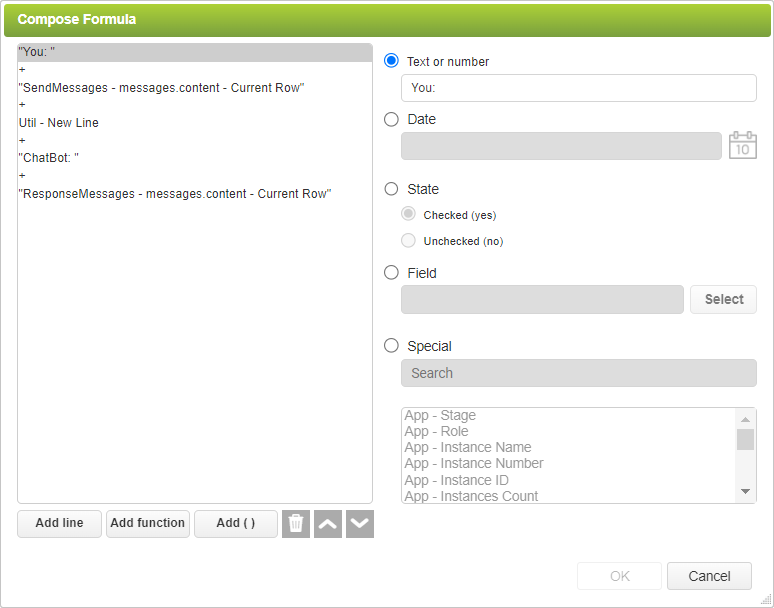
b) For the command linked by the False path set the "ChatHistory" field value using the Formula Editor as follows:
Note that the separator used in line 3 may need to be adjusted to suit the size of the app.
12. Add a Set Field behavior command. This command should be linked to from both of the Set Field commands mentioned above.
a) Set the "UserMessage" field to be empty (Text or Number = 'empty'.) This will remove the previously asked question allowing the user to ask a new question.
The behavior on the "Send - Button is pressed" event should look something like this:
Your chatbot interface app should now be ready to use.
Use the Previewing an App option to test it, then save, exit and publish your app.
|
To download a copy of this app and the OpenAI REST Web Service Connection, click here. Extract and save the app & connection files locally. Log on to PerfectApps, go to the Connections Dashboard and click the Import button. Then select the connection file you saved locally (.PA or .PF) and continue through the import steps. Go to the Apps Workspace and click the Import button. Then select the app file you saved locally (.PA or .PF) and continue through the import steps.
To learn how to import an app or connection into your account see App Management Video Tutorials |
 |
Note that if you import a copy of the app and connection, you will still have to Create an OpenAI account and generate your API Key. That key will need to be added to the app, see Step 7 above. |

|
AI Chat Bot Example (7 min) |
In the Set up a connection to the OpenAI API section, you will find a tutorial covering the creation of a REST API connection to the OpenAI API that can be utilized in a Chat Bot Application. This tutorial demonstrates how to connect your app to the OpenAI API connection. |

Return to: How to build an AI powered chatbot, Supported REST Web Services
