


Hello PerfectApps Community,
PerfectApps is a highly flexible platform that can build anything from simple forms to workflow applications. Today I would like to talk to you about adding the ability to save data. Saving will help users working on time-intensive forms. By adding save the risk of data loss is mitigated if the user has actively been saving their work. PerfectApps does not have a preconfigured save button however one can be built with the combination of behaviors and a ‘Button’ object. Before we begin it is important to understand the differences between Save and Submit.
- Save:
Does not check for fields that are required to proceed to the next stage.
Does not influence or allow the workflow to proceed. - Submit:
Checks that required fields are fulfilled to move a form forward in the workflow.
Moves the form forward in the workflow.
There are also multiple configurations to save that can be made to suit different needs and requirements, this post will walk through the configuration of ‘Save and Continue.’ ‘Save and Continue’ allows a user to submit data to the database without affecting the workflow or behaviors and re-open the form allowing work to resume.
We will begin with a sample workflow that will be used to demonstrate the build of our new functionality:
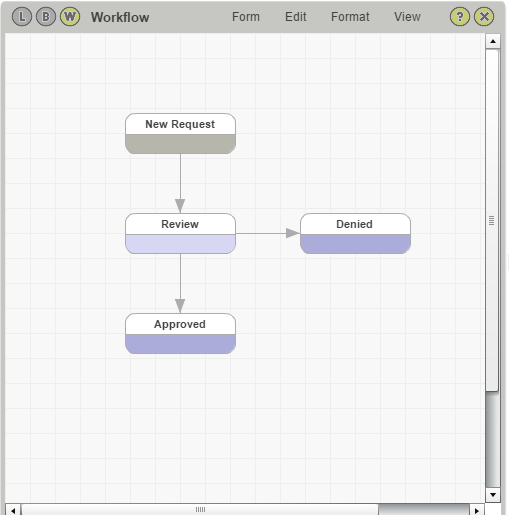
Based on the workflow provided, the only stages that we would like to allow the ability to save would be ‘New Request’ and ‘Review.’ The reason save will only be allowed on these two stages is that they are ‘Open’ stages. An open stage is a stage that is still active in the workflow and further input is still required. A ‘Closed’ is indicated by a purple color and is meant to be the end of a workflow where no further input is required.
Our next step will be to add a ‘Button’ object to our form which will be used as our ‘Save’ button. A ‘Button’ object is simply a blank button you are able to add any behaviors to in order to achieve the desired result. Next, click the ‘Button is Pressed’ text in the behavior section, this will open up your behavior canvas where you will drag on the following behaviors:
• Multi-Branch : Will be used to guide the logic based on the forms stage.
• Set Next Stage x 2 : Will be used to ensure the form does not proceed to the next stage.
• Submit Data : Will be used to submit the form data to the database.
(Example Below)
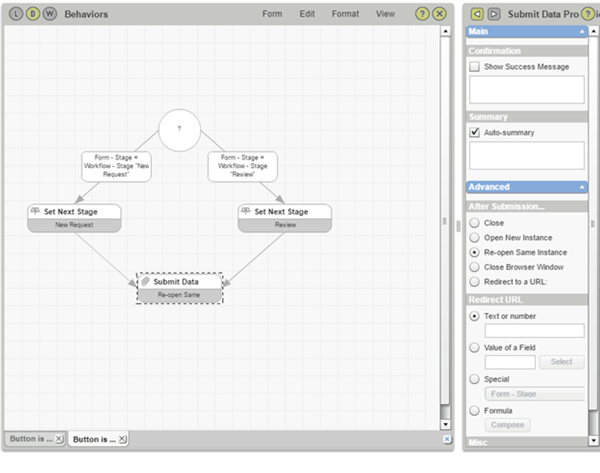
Once you have your objects available on the canvas you will want to position them following the example above. The ‘Multi-Branch’ will be the first behavior, this will allow a select path to be followed based on what stage the form is being viewed in. On the path that connects the ‘Multi-Branch’ to the ‘Set Next Stage’ you will add the logic (Form Stage = “New Request”.) By configuring the behavior in this manner you ensure that any behaviors following this path will only execute if the criteria are met. After you have configured the ‘Set Next Stage’ simply drag a path from the ‘Set Next Stage’ to the ‘Submit Data’ behavior, be sure to set the ‘Submit Data’ behavior to reopen the same instance. This will allow the form to reopen once the data has been written to the database. Now that you have completed the first path you can follow the same directions for the next stage(s) you would like to allow the user to save their work.
Once all the branches required have been completed your form will now have the ability to save data. By adding save you can now have peace of mind that users will no longer be at risk of losing large amounts of work if the connection fails or the form times out.
Thanks for reading, and happy form building.